Shapes
The Shapes panel in Maptaskr Power Maps allows you to draw, upload, and manage custom shapes directly on your map. Shapes are useful for highlighting areas, filtering data, or adding context to your spatial analysis. After adding a shape, you can edit its geometry, style, and properties for more advanced map interactions.
Drawing a Shape
When drawing a shape, you can choose from the following types:
| Type | Description |
|---|---|
| Point | A single coordinate (marker) used to pinpoint a location or label anchor. |
| Plot | A single coordinate (marker) placed by entering latitude and longitude values directly into input fields. |
| Line | A path made of connected vertices (routes, boundaries, corridors). |
| Polygon | A closed area used to represent zones, regions, catchments or coverage. |
| Circle | A round area defined by a centre point and radius. |
| Extent | A rectangular area used to define or highlight a map boundary. |
| Text | A standalone text label placed at a point for annotation. |
While drawing line and polygon shapes, the map shows live length measurements so you can see the distance as you place each point. This feature can be enabled or disabled in the configuration.
On Desktop
-
Select the
Shapestool in the left menu. -
Click
Add Shape. -
Choose
Draw Shape. -
Select the shape type you want to draw (e.g., polygon).
-
Click on the map to set your starting point, then continue clicking to define the shape.
If you have the exact coordinates for each point, you can enter them using the coordinate inputs in the top-left corner. This functionality works for all drawing tools.
-
Make sure the shape drawing tool is active.
-
Click the first input in the top-left corner and paste the latitude.
-
Click the second input and paste the longitude. Each time you paste into a field, the pin locks to that axis.
-
When the point is in the correct location, click on the map to finalize it. For multi-point shapes (line or polygon), repeat steps 1-3 for each additional point.
-
Double-click to finish the feature, or press Esc to cancel. Repeat to add additional features to the same shape until you have all the features you need.
-
Click
Saveto keep the shape, orCancelto try again.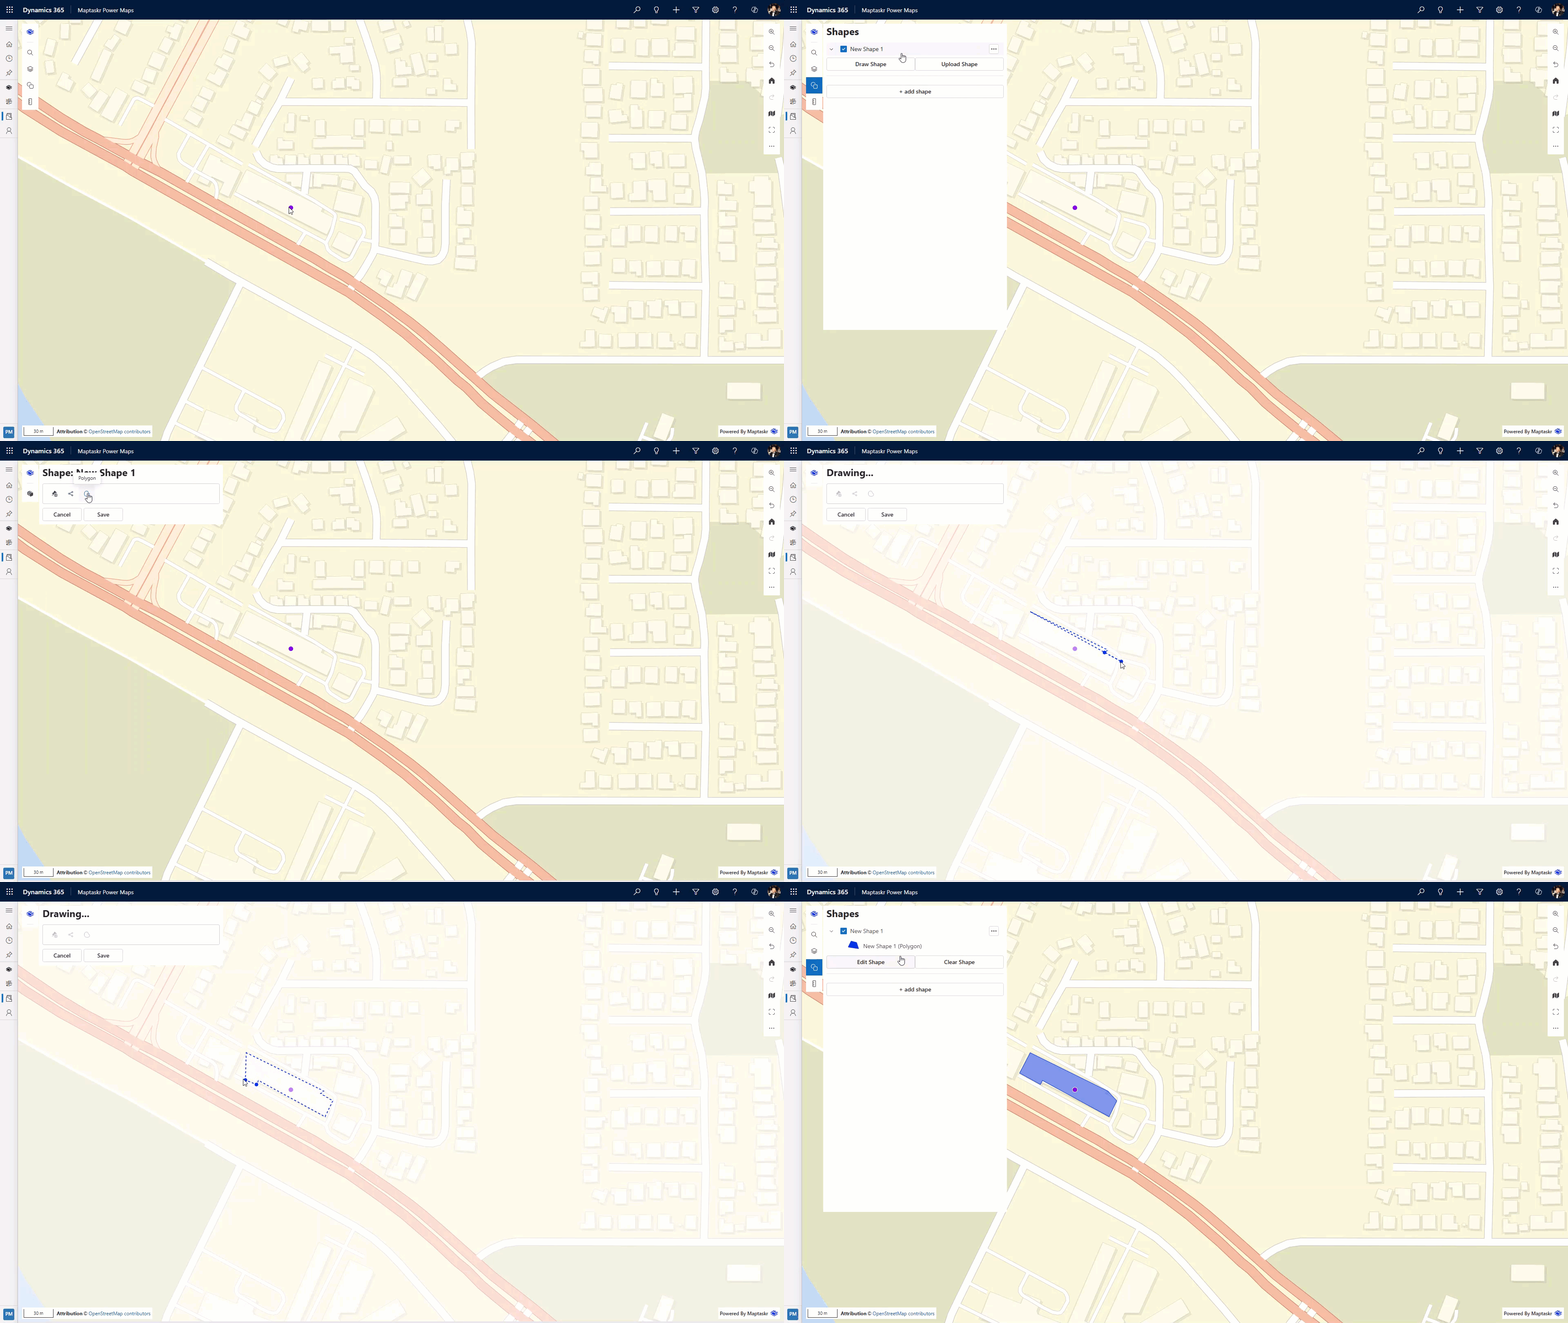
Snapping While Drawing
After selecting the feature type (Point, plot, line, polygon, circle, extent or text), you can use snapping tools from the drawing tool panel.
-
Start drawing a feature in the selected shape.
-
In the tool panel, select one of the snapping buttons:
| Snap Option | What It Does |
|---|---|
| Snap to Feature | Snaps the current point to nearby vertices or edges of existing features on the map when you are close enough. |
| Snap to Coordinate | Snaps point placement to the exact coordinate entered in the coordinate inputs. |
| Snap Axis | Constrains the next segment to fixed 45-degree increments, helping you keep direction controlled while drawing. |
- Continue placing points until the feature is complete, then finish as normal.
Desktop Shortcut
On desktop, while drawing, hold Shift to snap to the axis for the current point placement.
Mobile Behavior
On mobile, use the same snapping buttons in the tool panel while drawing. The behavior matches desktop, except there is no keyboard shortcut.
On Mobile
-
Select the
Shapestool in the left menu. -
Click
Add Shape. -
Choose
Draw Shape. -
Select the shape type you want to draw (e.g., polygon).
-
A crosshair appears fixed in the centre of the screen, and you move the map underneath it.
-
Pan: Drag the map with one finger to position the crosshair over the first point.
-
Add first point: Tap Click to add a point.
-
Add more points (Line/Polygon only): Pan to the next vertex and tap Click to add a point again. Repeat for each vertex.
-
Finish:
- Point: After the first tap you are done.
- Line: Tap Click to add a point on the final vertex, then tap Ok or double‑tap Click to add a point.
- Polygon: After placing the last vertex, either tap Ok or double‑tap Click to add a point.
-
Save or cancel: Tap Ok (top) to save the feature, or Cancel to discard.
-
Uploading a Shape File
-
Select the
Shapestool in the left menu. -
Click
Add Shape. -
Choose
Upload Shape.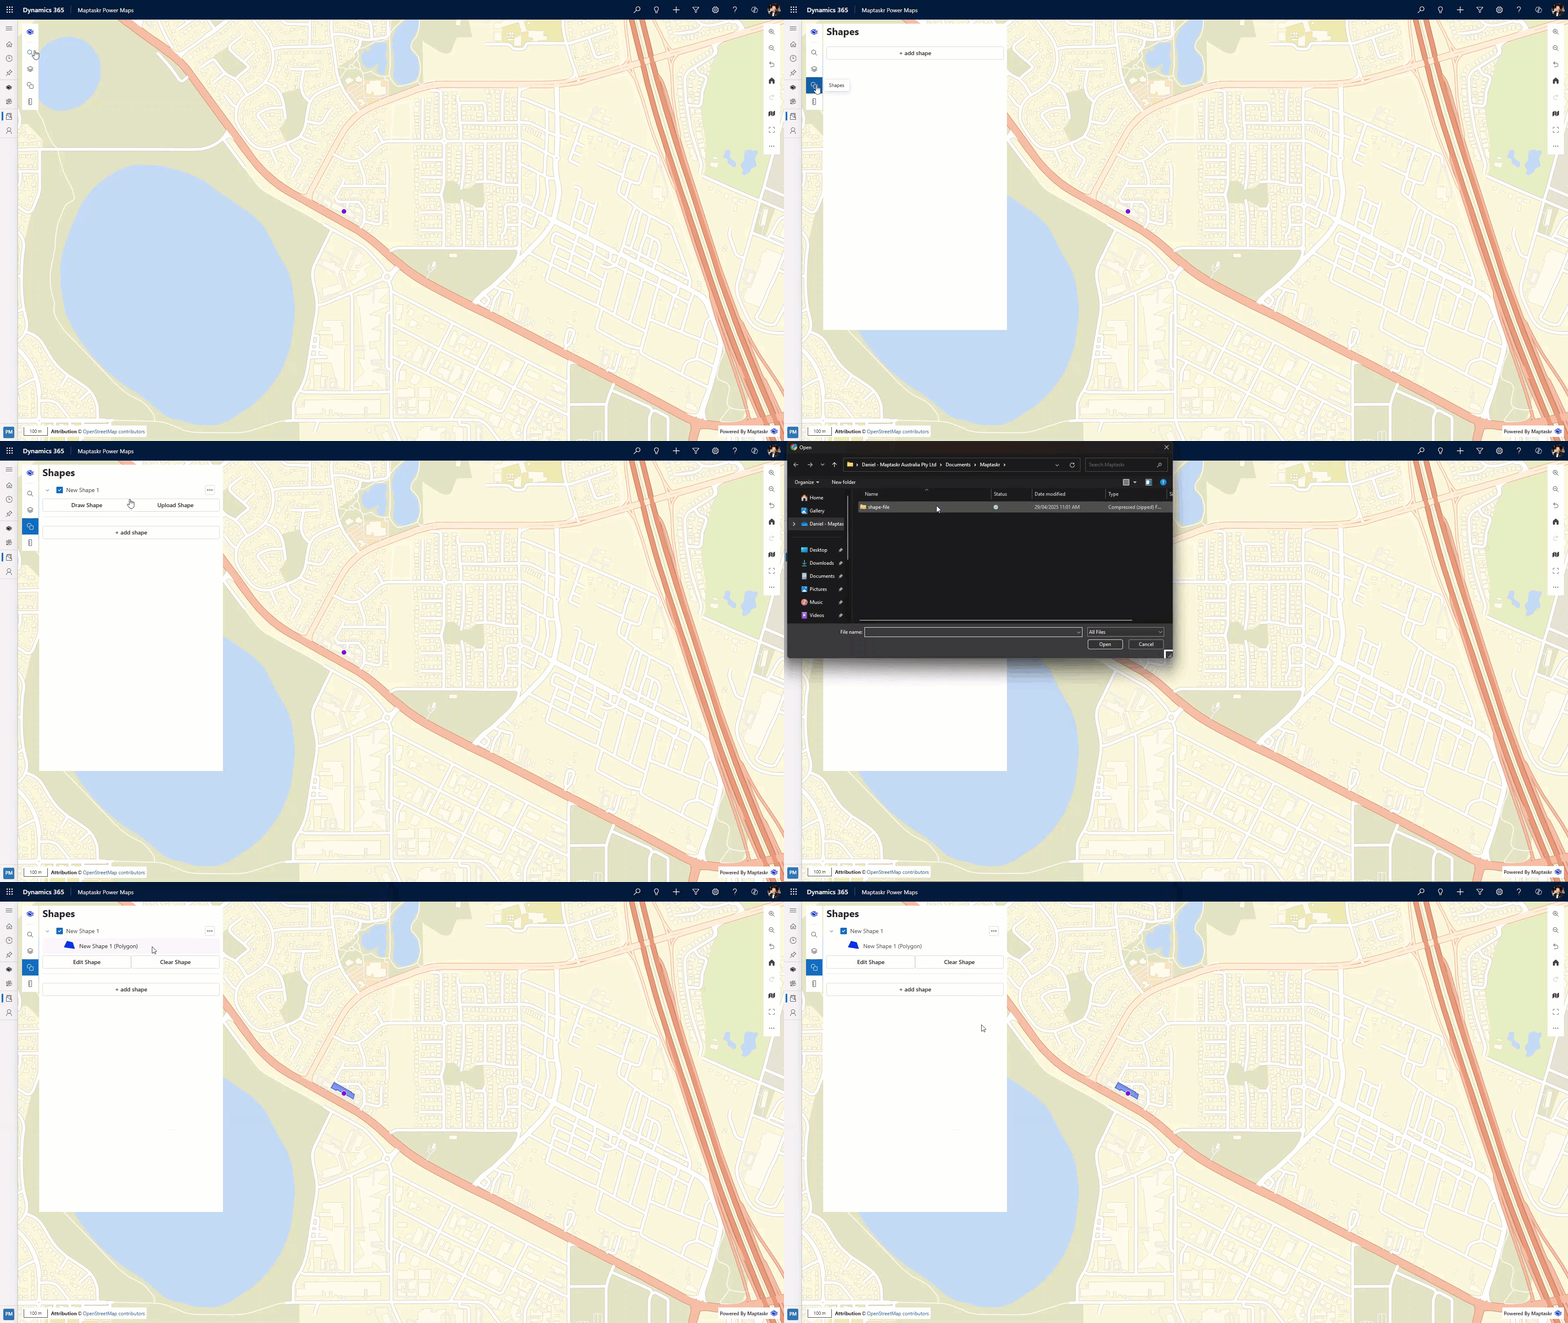
Format Comparison
| Aspect | GeoJSON | Shapefile (.zip) |
|---|---|---|
| Multiple geometries | Yes (FeatureCollection) | Yes (all features in file) |
| Attribute name length | Flexible | Limited (DBF constraint) |
| CRS handling | Must already be WGS84 | Reprojected if .prj supplied; else assumed WGS84 |
| Human editable | Yes (plain text) | Requires GIS tooling |
Best Practices
- Simplify very dense polygons to reduce vertex count and speed rendering.
- Remove unnecessary properties before upload to keep the attribute panel focused.
- Validate polygons (avoid self‑intersections) to prevent rendering issues.
Large shape files increase load time and browser memory usage.
Default limit: 100 MB per upload (GeoJSON or zipped Shapefile) for both AppSource and manual installations. If your organisation has customised this limit, check with your administrator.
Recommended working size: Keep individual uploads under ~10 MB where possible for smoother interaction, especially on lower‑spec devices.
If an upload stalls or fails:
-
Simplify geometry (reduce vertex count / dissolve unnecessary detail).
-
Split very large datasets into thematic or regional subsets.
-
Remove unused attribute fields to shrink file size.
-
For Shapefiles: ensure only one layer per ZIP and that it is compressed (no nested folders).
Note: Extremely high vertex counts (even in smaller files) can still degrade pan/zoom performance; simplification often helps more than raw MB reduction.
Editing and Managing Shapes
Once a shape is drawn or uploaded, you can edit, rename, or delete it using the options menu for that shape.
| Option | Description |
|---|---|
| Zoom to Extent | Zooms the map to show the full extent of the shape. |
| Use as Filter | Uses the shape as a filter to visualize related data. |
| Opacity | Adjusts the opacity of the shape. |
| Copy to Clipboard | Copies the shape's geometry to the clipboard. |
| Edit Shape | Enables editing of the shape’s geometry. |
| Rename Shape | Allows you to rename the shape. |
| Delete Shape | Removes the shape from the map. |
To edit a shape:
-
Select
Edit Shapefrom the shape’s options menu or from the buttons below the shape. -
Select the shape on the map to open the attributes panel.
-
In the attributes panel, you can:
Feature Description Override styling Override the configured fill and stoke colors and type. Learn more Attributes list Store properties for styling and labels (not for additional metadata). Edit Geometry Edit the shape’s points directly on the map. Delete Feature Removes the selected feature (point/line/polygon) from the shape without affecting the others.
According to the GeoJSON Specification (RFC 7946), the properties object is intended for application-specific attributes. To maintain compatibility and ensure clean data, only styles and labels are stored in the attributes list, avoiding additional metadata that could conflict with the standard.
-
Click
Okto save your changes. -
Click
Okagain to confirm any other edits made while in edit mode.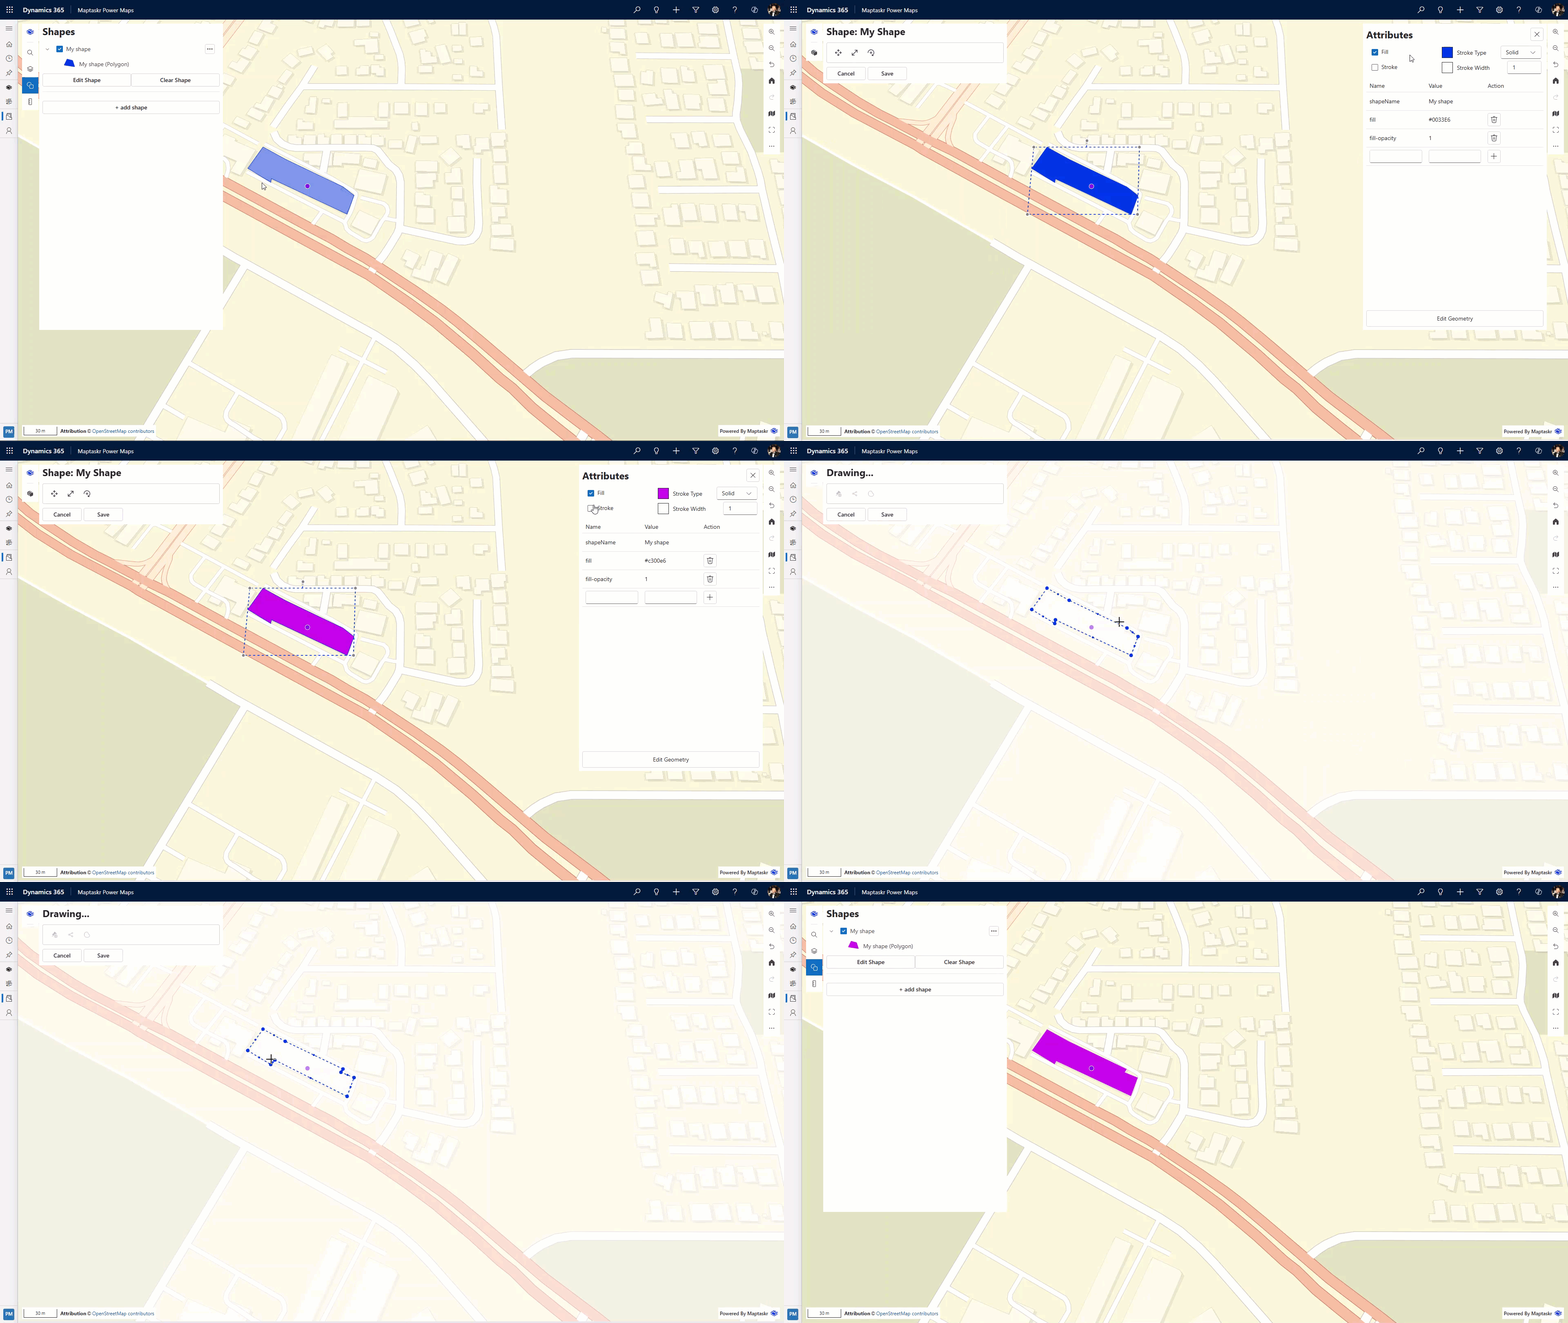
Edit Geometry
On Desktop
-
Enter shape edit mode: Either (a) select the shape on the map then click Edit Shape in the attributes panel, or (b) open the shape menu in the Shapes panel and choose Edit Shape.
-
If the shape contains multiple features, click the specific feature (point / line / polygon) you want to modify.
-
Click Edit Geometry.
-
Vertices (control points) appear:
- Point: Drag the marker to its new location.
- Line / Polygon: Drag any vertex to reposition it. (If midpoint handles are shown you can drag them to refine the shape.)
-
Click Ok to apply geometry changes (Esc cancels the current geometry edit).
-
Click Ok again (shape toolbar) to save all edits, or Cancel to discard.
On Mobile
-
Enter shape edit mode: Either (a) select the shape on the map then click Edit Shape in the attributes panel, or (b) open the shape menu in the Shapes panel and choose Edit Shape.
-
If the shape contains multiple features, click the specific feature (point / line / polygon) you want to modify.
-
Click Edit Geometry.
-
A crosshair appears fixed in the centre of the screen (you move the map underneath it).
-
Pan: Drag the map with one finger to position the crosshair over the first point.
-
Move the first point: Tap Click to Grab a point, then drag the map with one finger to position the crosshair over the new location for that point.
-
Edit more points (line/polygon only): Pan to the next vertex and tap Click to Grab a point again. Repeat for each vertex.
-
Finish: Tap Ok to save the edited geometry.
-
Save or cancel: Tap Ok (top) to save the feature, or Cancel to discard.
-
Shape Attributes
The Shapes Properties panel lets you adjust geometry, styling, and stored attributes for any drawn shape.
-
Select Edit Geometry to modify a point, line, or polygon.
-
Control points (vertex handles) appear on the feature. Drag these to move vertices, reshape the geometry, or reposition points/lines.
-
When finished, click Ok (or Cancel to discard).
- Ensure geometry remains valid (avoid self‑intersections) before saving.
- Attribute entries here are intended for styling/labeling consistency with GeoJSON best practices.
Styling Shapes
By default, styling is inherited from the configuration profile. Use the Shape Properties Override Styles option to manually adjust fill color, stroke color, stroke width, and stroke type.
Using Shape Tools
Move
-
Ensure the shape is in Edit mode.
-
Click the Move tool.
-
Click and hold the feature, then drag it to the new location.
-
Release the mouse when positioned correctly.
-
Deselect Move and click Ok to save (or Cancel to discard).
Scale
-
Ensure the shape is in Edit mode.
-
Click the Scale tool.
-
Click and hold the feature's edges, then drag in or out to scale.
-
Release the mouse when positioned correctly.
-
Deselect Scale and click Ok to save (or Cancel to discard).
Rotate
-
Ensure the shape is in Edit mode.
-
Click the Rotate tool.
-
Click and hold the feature's edges, then drag up or down to rotate the feature.
-
Release the mouse when positioned correctly.
-
Deselect Rotate and click Ok to save (or Cancel to discard).
Features
The Features panel lists all features (points, lines, and polygons) contained within the selected shape. From here you can:
- Highlight a feature on the map by selecting it.
- Edit its geometry (enters geometry edit mode for that feature).
- View or adjust its styling/attributes (where supported).
- Delete a feature you no longer need.
Use this panel to quickly manage complex shapes composed of multiple feature types.
Editing a Shape's Geometry
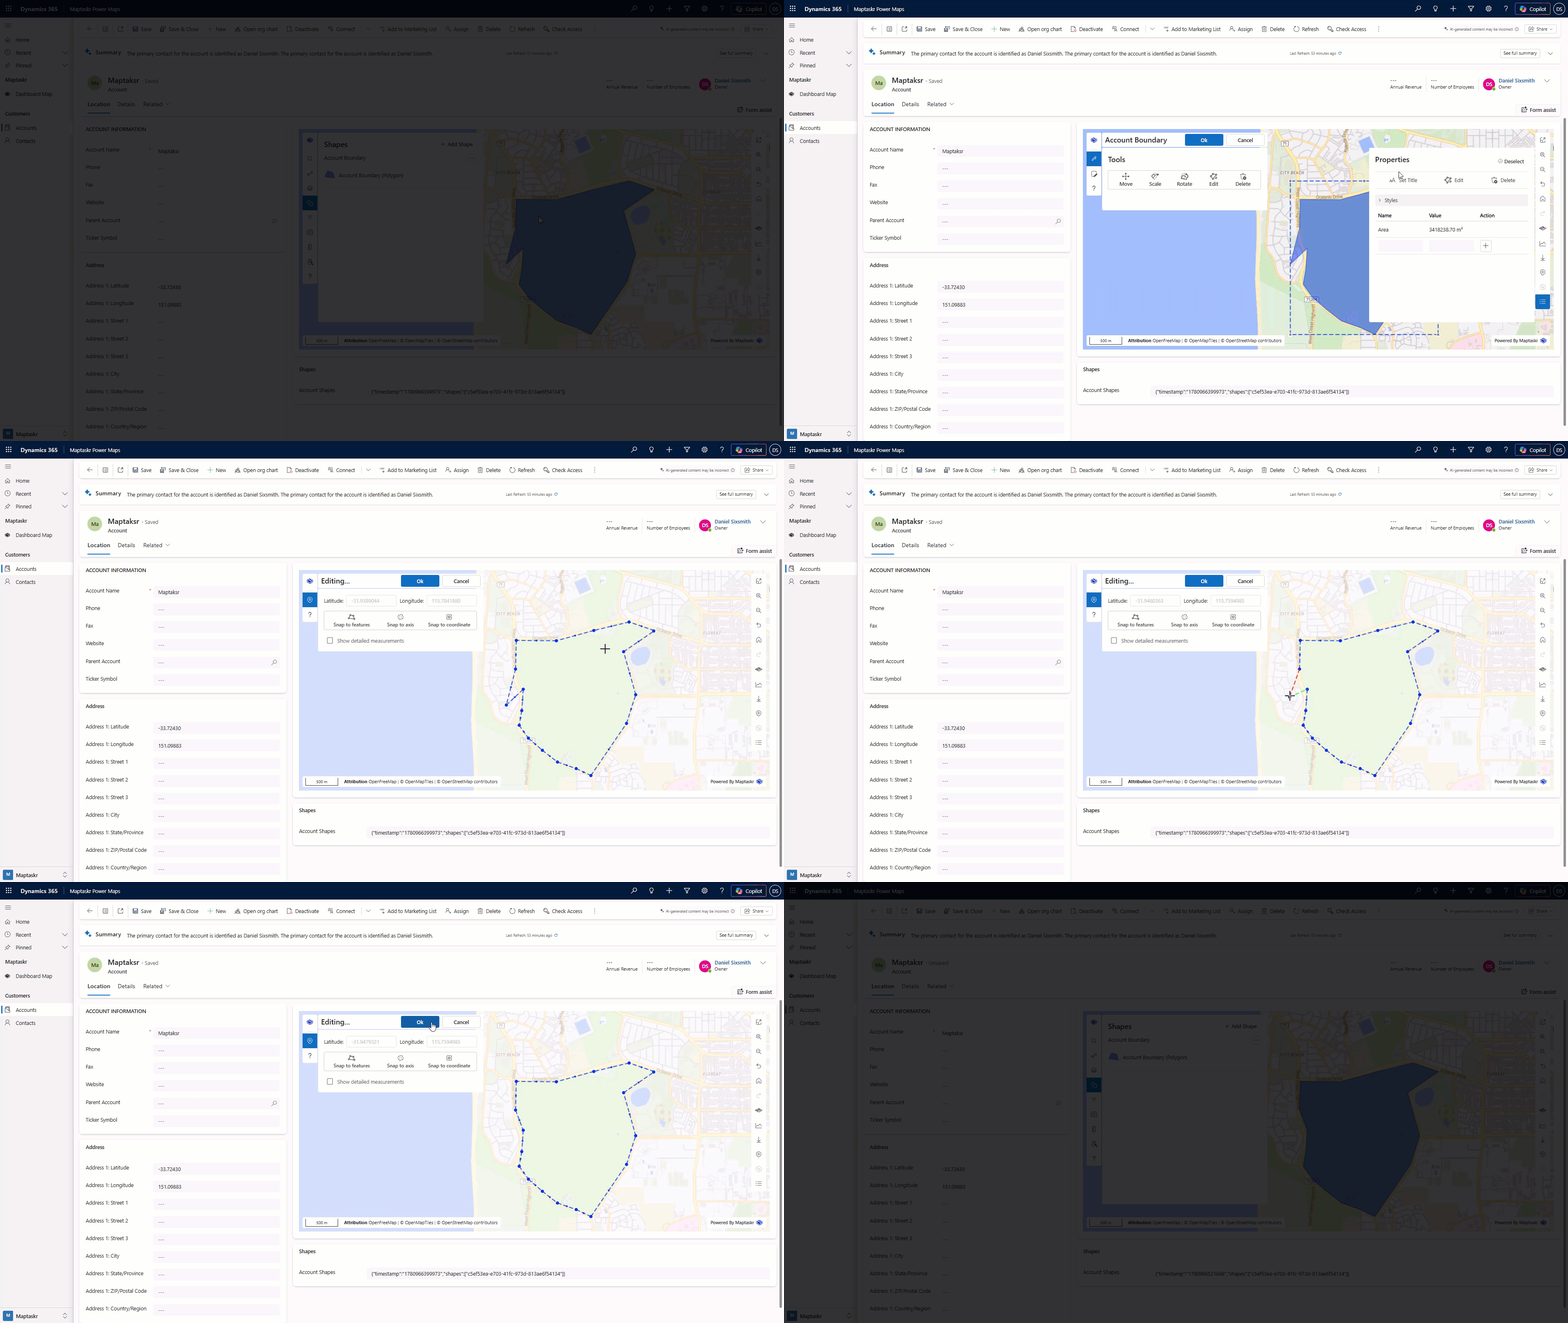
As part of shape management, you can edit the geometry of a single drawn feature down to each vertex. Select and hold a vertex, then press Backspace to remove it.
Keep in mind that each feature type requires a minimum number of points to render correctly.
Use the following steps:
-
Open the Shapes panel.
-
Draw a new shape, or open an existing shape in edit mode.
-
Select the specific feature you want to adjust.
-
Select Edit from the feature actions.
-
To remove a vertex:
- While creating a new feature, hold the vertex and press
Backspace. - While editing an existing feature, pick up and hold the vertex, then press
Backspace.
- While creating a new feature, hold the vertex and press
Multiselection of Features within Shapes
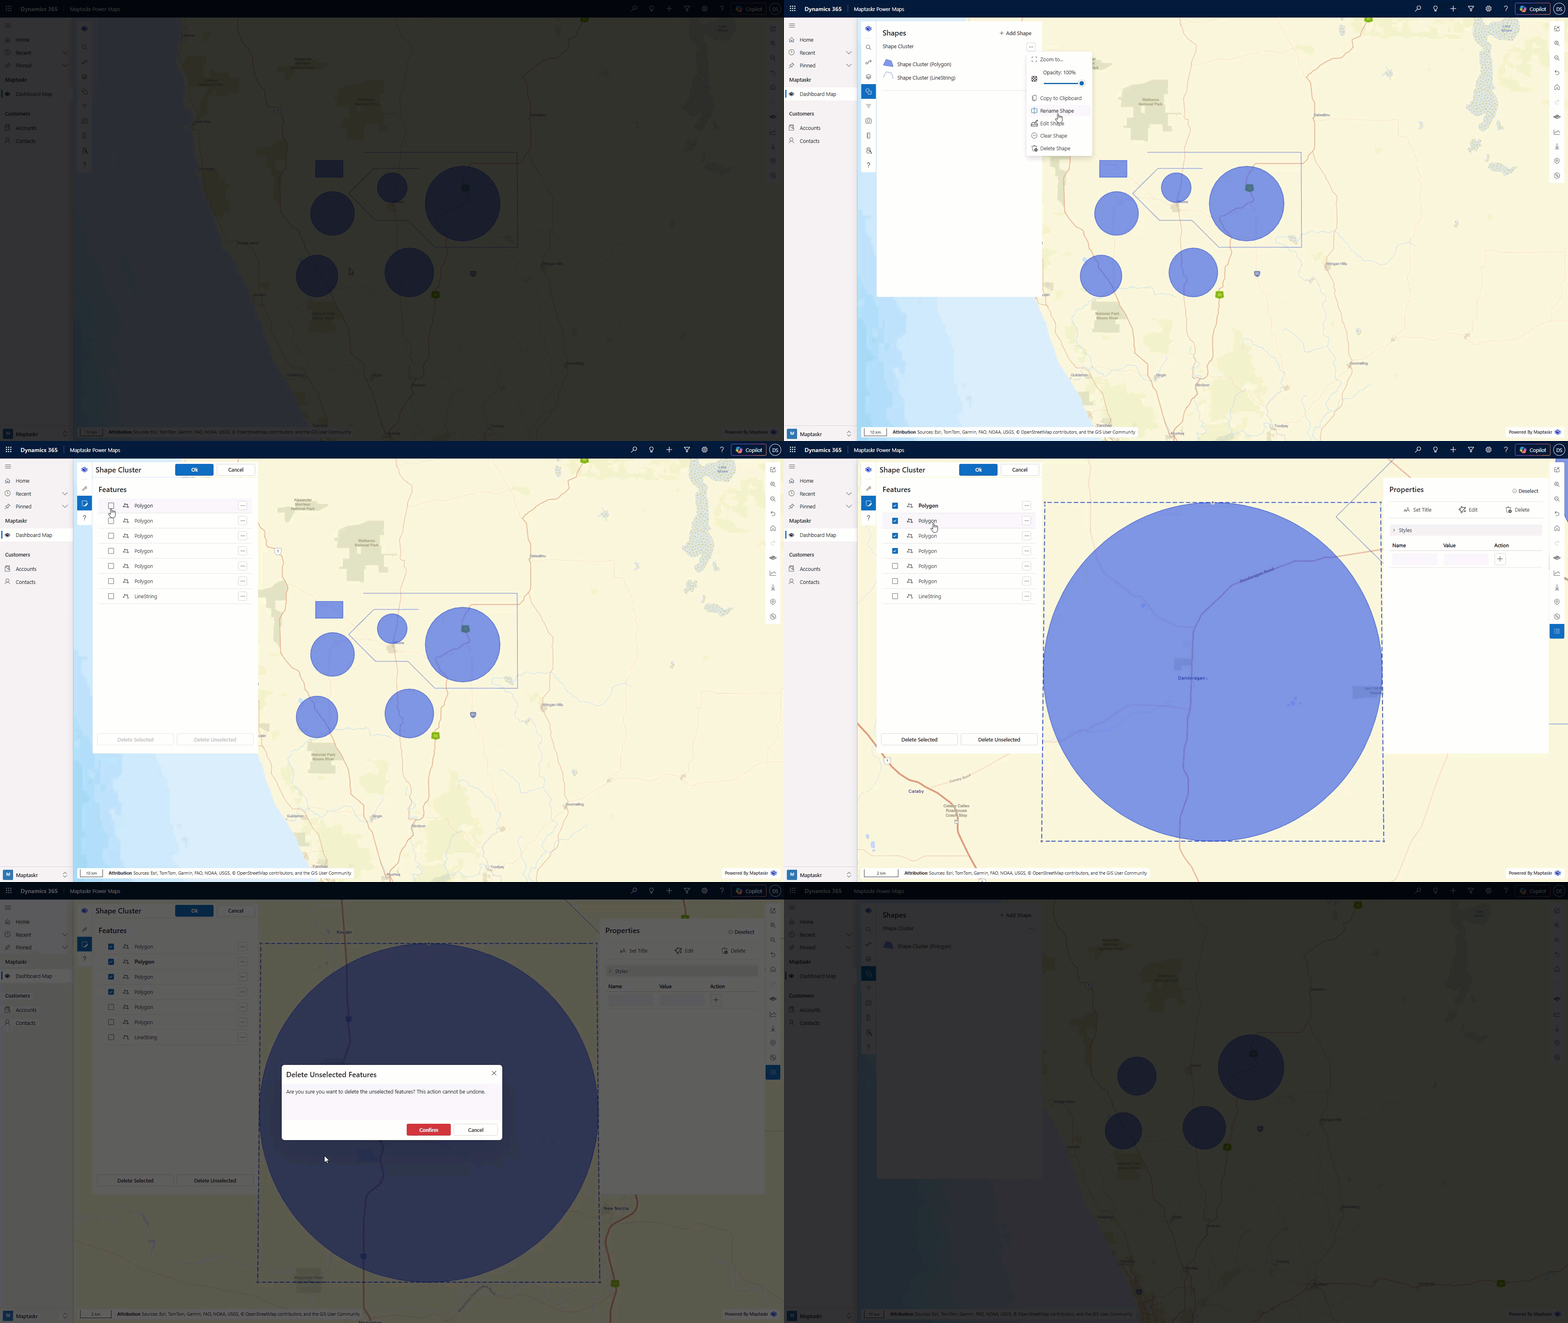
You can add multiple features to a single shape and then select several features from the feature list to manage them together. This makes it easy to remove only the features you no longer need, or keep only the ones you want.
To select multiple features:
-
Open the Shapes panel.
-
Open an existing shape with multiple features, or create a new shape with more than one feature.
-
Open the Features list for that shape.
-
Select the features you want to keep or remove.
-
Choose one of the following actions:
- Delete Selected to remove the selected features.
- Delete Unselected to remove everything except the selected features.