Mobile Offline Profile & Filters
This guide covers creating and optimizing a Mobile Offline Profile so only the right Dataverse data syncs to devices for Maptaskr offline scenarios.
Plan Before You Click
| Question | Why it Matters |
|---|---|
| Which user roles need offline? | Avoid bloating profile with unneeded tables |
| Which tasks must work offline? | Drives required tables & columns |
| Geographic scope? | Enables bounding-box or region filters |
| Record freshness needed? | Determines date windows (e.g., last 60–90 days) |
Create the Profile
-
Navigate to admin.powerplatform.microsoft.com > correct environment.
-
Open Settings > Mobile Configuration.
-
Select New Profile.
-
Name clearly (e.g., FieldOps-Core, Sales-Lite). Add a description.
-
Save (creates the shell).
Add Tables
-
In the profile, choose Add Table.
-
Select only tables already enabled for offline (see previous page).
- Below are the tables required for any Maptaskr Mobile Offline profile to function. Add ALL of these first, then add your domain/business tables with filters.
Required Core Dynamics Tables
| Table | Rows | Purpose |
|---|---|---|
| User (System User) | All Rows | Owner / lookup resolution & current user context |
| Business Unit | All Rows | BU hierarchy & security scoping |
| Security Role | All Rows | Role-based permission evaluation |
| Team | All Rows | Team-owned record & sharing resolution |
| Note (Annotation) | All Rows (consider filter later) | User access to notes & attachments offline |
Notes (Annotation) records can dramatically inflate offline payload size when they include large file attachments (images, PDFs, spreadsheets). To keep sync lean:
- Filter by ModifiedOn (e.g., last 30–60 days) after initial rollout.
- Exclude or separately handle very large attachments (>2–5 MB) via alternative retrieval logic.
- Limit offline Notes to those relevant to Maptaskr Power Maps scenarios instead of all system note traffic.
- Periodically audit aggregate attachment size per device/user and adjust filters.
Result: faster initial sync and reduced storage consumption without losing operationally relevant context.
Required Maptaskr Tables
| Table | Purpose / Description |
|---|---|
| Maptaskr Core Layer | Persists configured layers |
| Maptaskr Core License Assignment | License linkage for feature entitlement |
| Maptaskr Core Licensed User | Determines which users are licensed offline |
| Maptaskr Core Licensed URL | Validates environment / tenant licensing context |
| Maptaskr Core License (Layer-Maptaskr Core License) | Layer-to-license relationship (naming may vary) |
| Maptaskr Core Config | Global configuration values |
| Maptaskr Core Config Property | Key/value style extended config |
| Maptaskr Core Service Provider | External provider definitions (e.g., basemap, geocode) |
| Maptaskr Core Service Provider Property | Provider-specific settings |
| Maptaskr Core Authentication Profile | Auth profiles for providers and process auth request |
| Maptaskr Core Authentication Profile Request | Contains secrets for client-side authentication. Only include this table offline if you are using client-side auth (learn more) |
| Maptaskr Core Basemap Layer | Base map layer definitions |
| Maptaskr Core Basemap Layer Property | Basemap layer configuration properties |
| Maptaskr Core Layer Group | Logical grouping of sub layers |
| Maptaskr Core Sub Layer | Individual map sub layer definitions |
| Maptaskr Core Sub Layer Property | Sub layer configuration properties |
| Maptaskr Core Shape | Persisted shapes / geometries |
| Maptaskr Core Resource | Internal resource metadata (icons, etc.) |
| Maptaskr Core Offline Region | Region definitions for offline caching |
| Maptaskr Core Offline Cache | Cache entries metadata for offline resources |
| Maptaskr Core Migration Version | Tracks schema/version alignment |
Be mindful of data volume
When configuring these tables for offline sync, remember that more columns mean more data in your offline profile. While these platform and configuration tables are typically small in volume and critical for functionality, you should still be thoughtful about which columns you include. Only sync the columns your offline users actually need—partial column filtering helps keep payload sizes manageable while maintaining the dependencies required for reliable offline operation (e.g., a sub layer referencing a provider property).
Adding Your Business Tables
After the required sets above, add each business/domain table you previously enabled (Accounts, Work Orders, Assets, etc.) and immediately define filters (date window, status, ownership) to control volume. As you can tell you can only add dataverse tables here for offline consumption, in the next section we will cover how to take off a non-dataverse layer.
Add required core tables first, then configuration (Maptaskr Core) tables, then business tables. This ensures lookup dependencies resolve on first sync.
Quick Audit Checklist
Use this mental checklist before publishing:
- All required Dynamics tables present
- All required Maptaskr tables present
- No large business table added without a filter
- Notes volume acceptable or slated for filtering
- Naming consistent
When assign
Common Pitfalls
| Pitfall | Prevention |
|---|---|
| Enabled table not syncing | Forgot to add to profile |
| Unexpected huge payload | Filter left blank (Full Sync fallback) |
| Users see stale data | Overly broad date window |
| Security mismatch | Role not assigned profile |
Attach the Profile to an App
-
Navigate to make.powerapps.com.
-
Select Apps in the left navigation.
-
Open the model‑driven app you want to enable (ellipsis ••• > Edit or select then Edit).
-
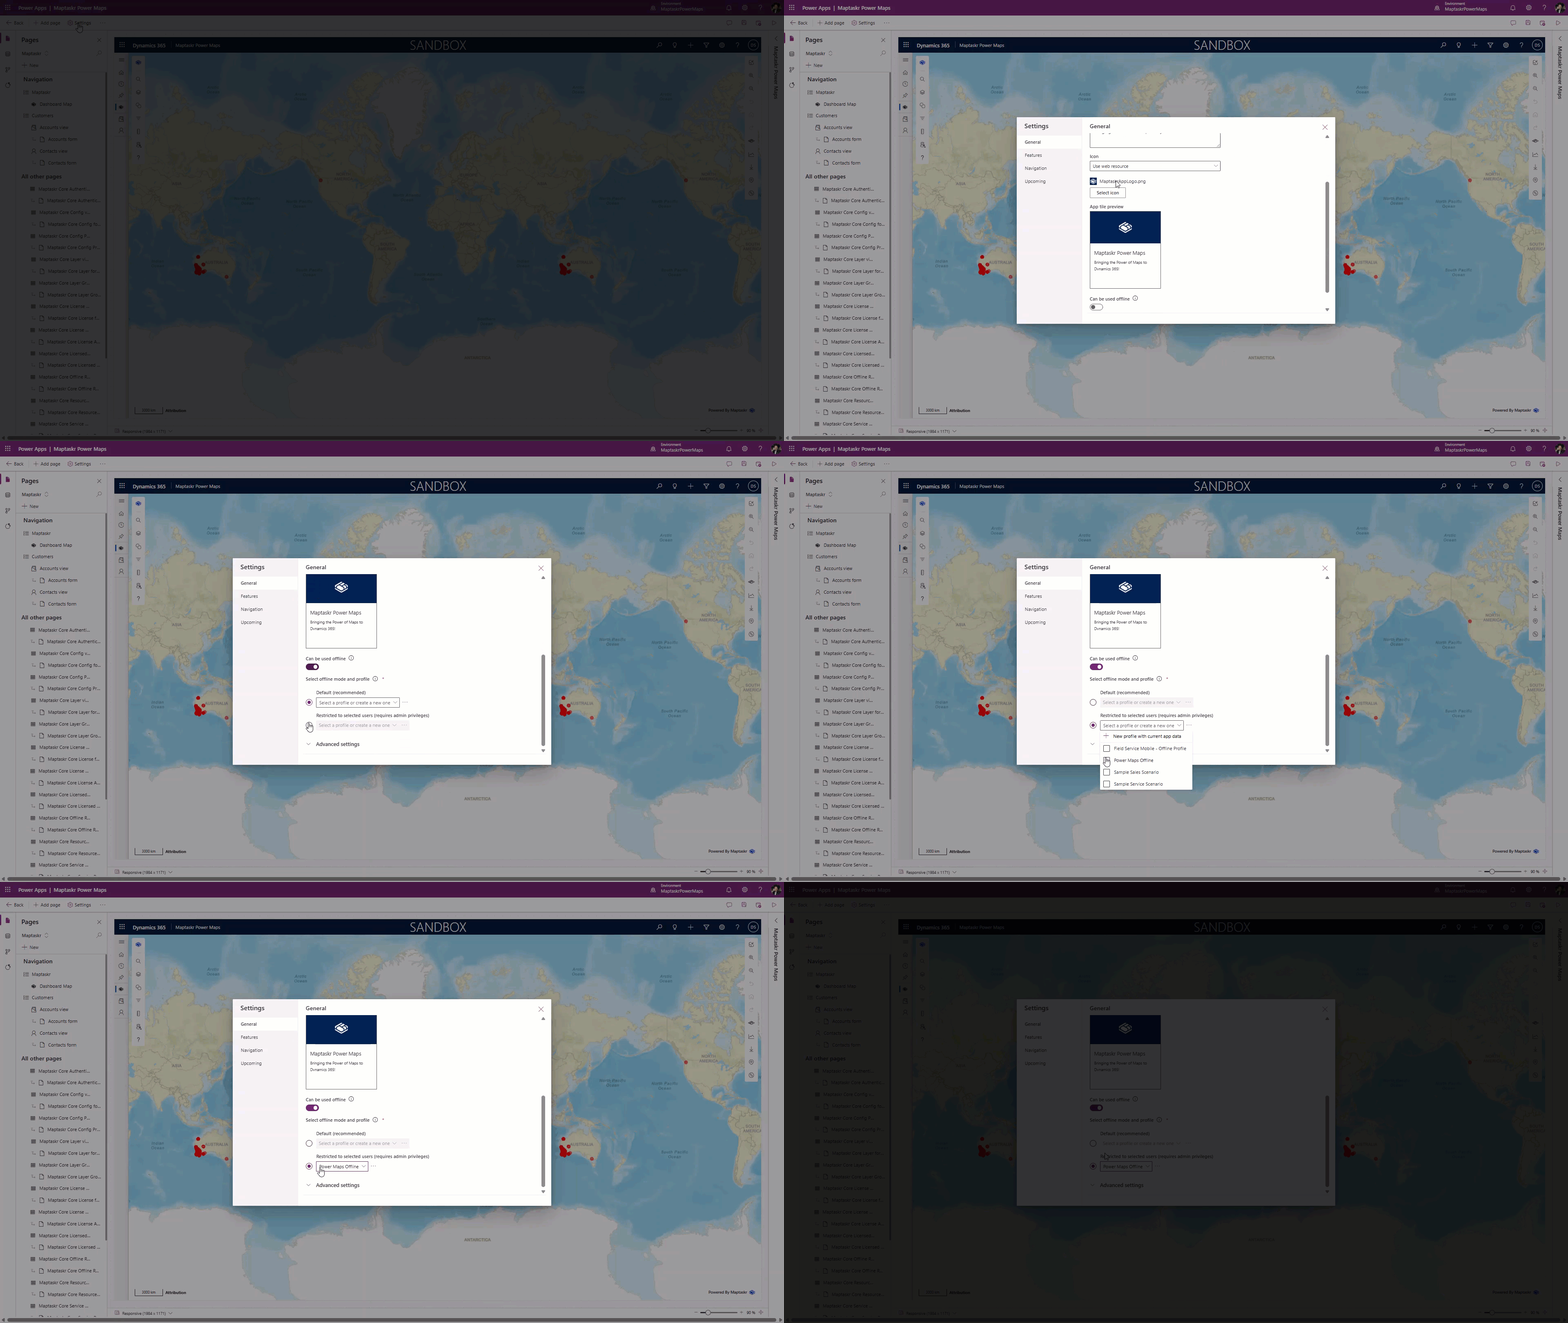
Select Settings (gear icon in app designer or command bar depending on UI version).
-
Enable Can be used offline (toggle ON).
-
Choose your newly created Mobile Offline Profile from the dropdown.

-
Click Save.
-
Publish the app so end users receive the offline profile association.
If several apps need the same offline data, attach the same profile to each—avoid duplicating profiles unless filters or role scope differ.
Changes to the profile (tables/filters) usually do not require republishing the app, but any change to the app setting itself (toggling offline) does.
Toggle Online Mode
-
Navigate to make.powerapps.com.
-
Select Apps in the left navigation.
-
Open the model‑driven app you want to enable (ellipsis ••• > Edit or select then Edit).
-
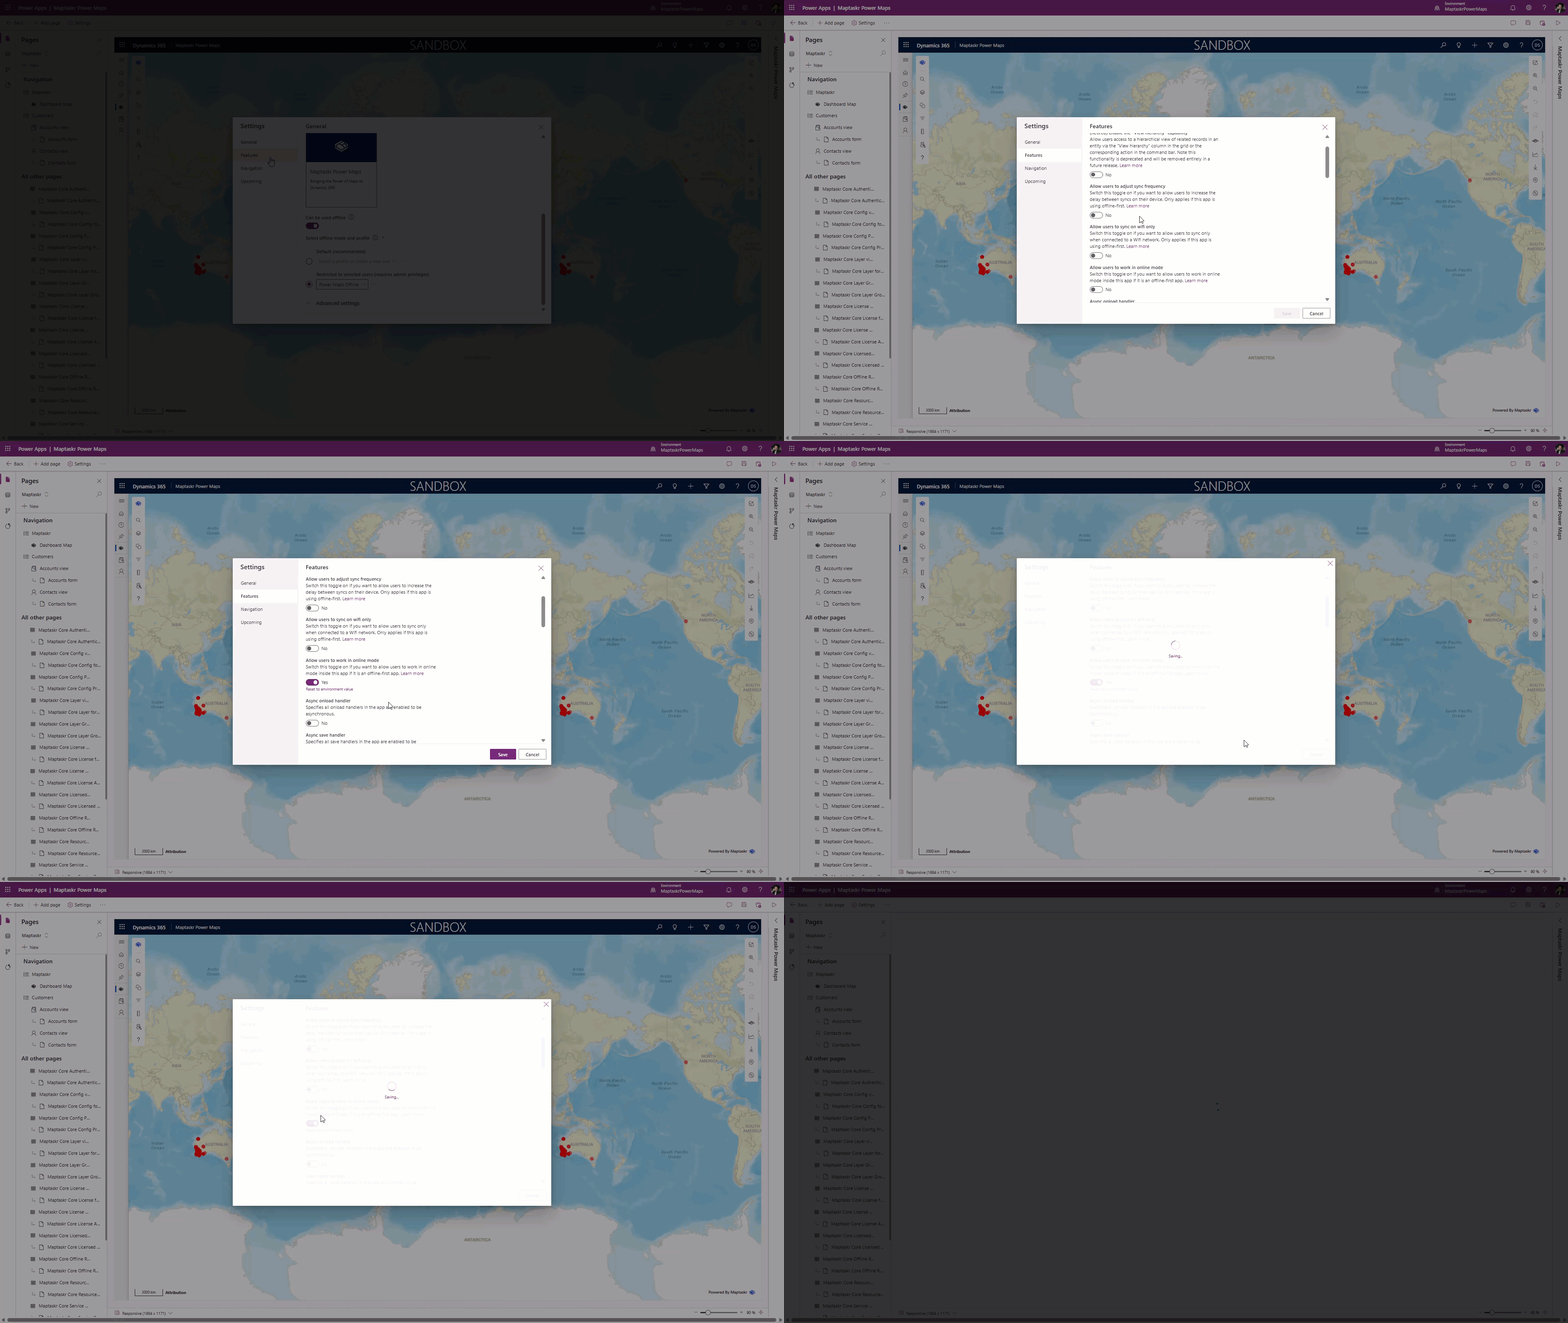
Select Settings (gear icon in app designer or command bar depending on UI version).
-
Select Features navigation item
-
Find and toggle on Allow users to work in online mode
-
Click Save

- Publish the app so end users receive the offline profile association.
Back: Prerequisites | Continue: Offline Maptaskr Config →