Adding a Layer
The Layer Gallery in the Maptaskr Power Maps app lets you organize, configure, and manage map layers for your organization. This comprehensive guide explains how to create layer groups, add new layers (from URLs or Dataverse), configure their core properties including names and descriptions, set up filtering rules, and optimize performance settings. By following these steps, you can ensure your map layers are structured, secure, and tailored to your business needs.
Layer Groups
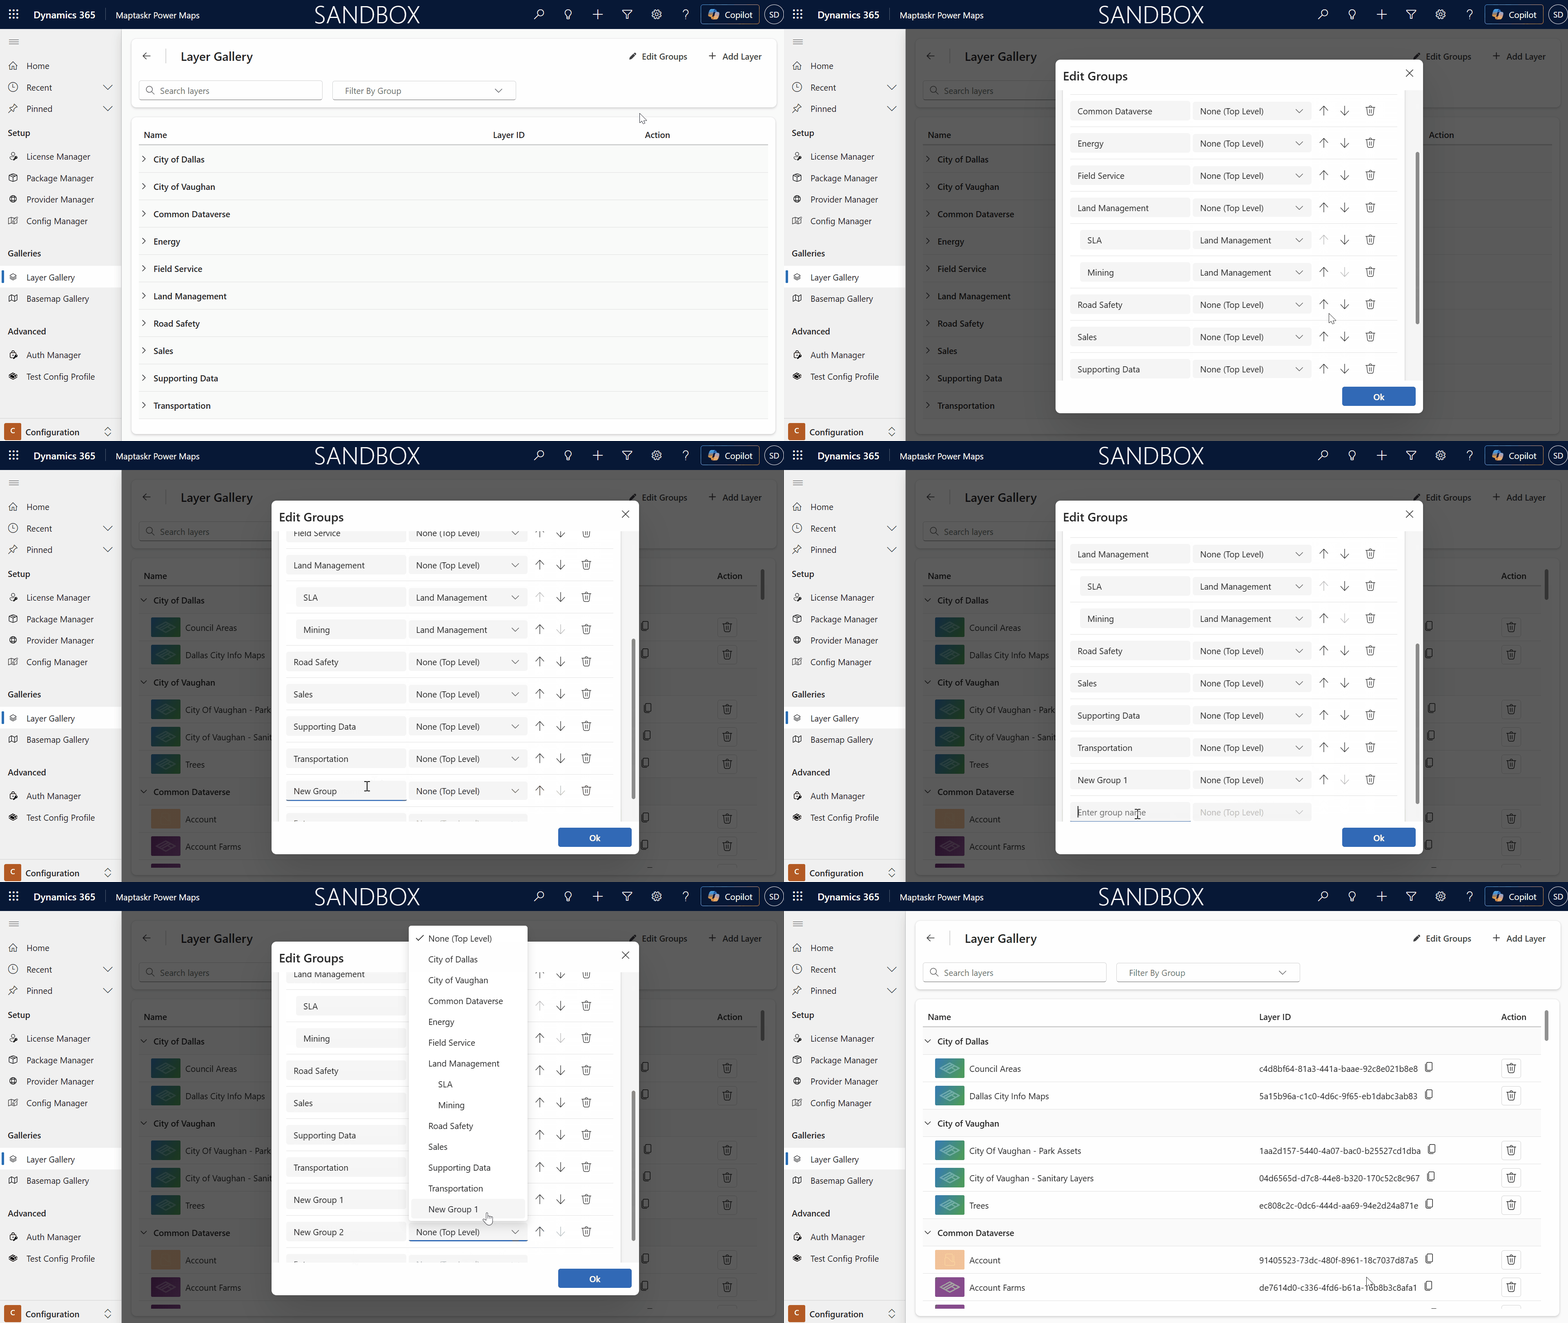
Layer Groups help you organize related map layers. At least one group is required before adding layers. Groups can be nested to create a hierarchy for the Add Layer gallery.
To create or edit a Layer Group:
-
Open the Maptaskr Power Maps app and navigate to Configuration > Galleries > Layer Gallery.
-
Click Edit Groups in the heading.
-
Type the name of the new group, or update the name of an existing group.
-
Select a Parent Group to nest the group below it, or leave it blank to keep the group at the top level.
-
Use the up and down arrows to order groups that have the same parent.
-
Changes are saved automatically. Click OK when done.
The gallery displays group indentation for up to five levels. A group cannot be assigned to itself or one of its descendants.
Adding Layers
Use the Layer Wizard to add a layer from a supported geospatial service or Dataverse. Each layer must belong to a group.
Adding a Layer with the Layer Wizard
- In the Layer Gallery, select Add Layer.
- Under Choose Type, select the type of data source or geospatial service to connect to. Use Learn More to review the endpoint requirements for that type, or see Supported Layers.
- Select Start.
- Under Connect, enter the layer URL. For a Dataverse layer, select the table instead.
- Wait for Power Maps to validate the connection and retrieve the available layers. If the service requires authentication, select the appropriate authentication profile.
- When the connection succeeds, select Next.
- Under Details, enter a layer title, select the Layer Group, and optionally add a description.
- Under Select Layers, choose the sublayers to include. Select All Layers to include every available sublayer. A service with one sublayer is selected automatically.
- Select Next to create the layer. When the confirmation shows that the layer has been added to the Layer Gallery, select Finish.
- Continue to Common Layer Configuration.
If authentication is required, select an authentication profile when prompted. See Authentication Manager.
Manual Configuration
Select Configure Manually in the wizard when the service cannot be validated automatically or when you need to configure the connection without using the wizard. The manual flow opens the layer creation page, where you provide the layer type, group, connection details, and optional authentication before configuring the layer details. Manual configuration also gives you access to more advanced configuration options.
Can I change a layer url after I have added it?
Yes, you can change a layer URL. Before you do, note the following:
-
If the new URL is invalid, or points to a layer with different attributes or styles, it can negatively affect your Maptaskr Power Maps configuration.
-
You will need to manually re-cache offline data for this layer after changing the URL.
-
If the URL points to a different data source, contains different attributes or styles, create a new layer from the Layer Gallery instead of replacing the existing one.
warningThis function is intended for cases where the layer URL needs to be updated due to changes in the source, such as a new server or endpoint, while keeping the same data structure and styling. Always ensure that the new URL is compatible with your existing configuration to avoid issues.
To change a layer URL:
-
Open the layer you want to update in Layer Gallery.
-
On the Connect tab, click Edit Layer URL.
-
Update the Replacement Layer URL and all child layer URLs, ensuring that no URLs are referring to your old layer URL
-
To complete the change, check the confirmation checkbox.
-
Click Save Changes.
Common Layer Configuration
After adding a layer, configure its features and properties:
-
Select the Features tab.
-
Review available layers and enable the ones you want. Click a layer name to manage its features. Selecting the root layer applies actions to all sub-layers.
-
Configure the following options:
| Feature | Description |
|---|---|
| Layer Details | Configure fundamental properties including layer name, description, filtering rules, and performance settings. Learn more |
| Layer Features | Enable quantization, add a description, and manage filtering. Learn more |
| Layer Styles | Customize styles. Enable Always use latest styles to sync with the API. Learn more |
| Layer Attributes | Manage attributes. Enable for Dynamics, set visibility, reorder, adjust display type, and create Feature Title templates. Learn more |
| Layer Actions | Configure actions for events: ExecuteJs, HTTPRequest, OpenD365Modal, SetAttribute, URLNavigate. Learn more |